antique

the nursery

Yes, nursery! Hence my long blog silence (babies are time-consuming, guys…)

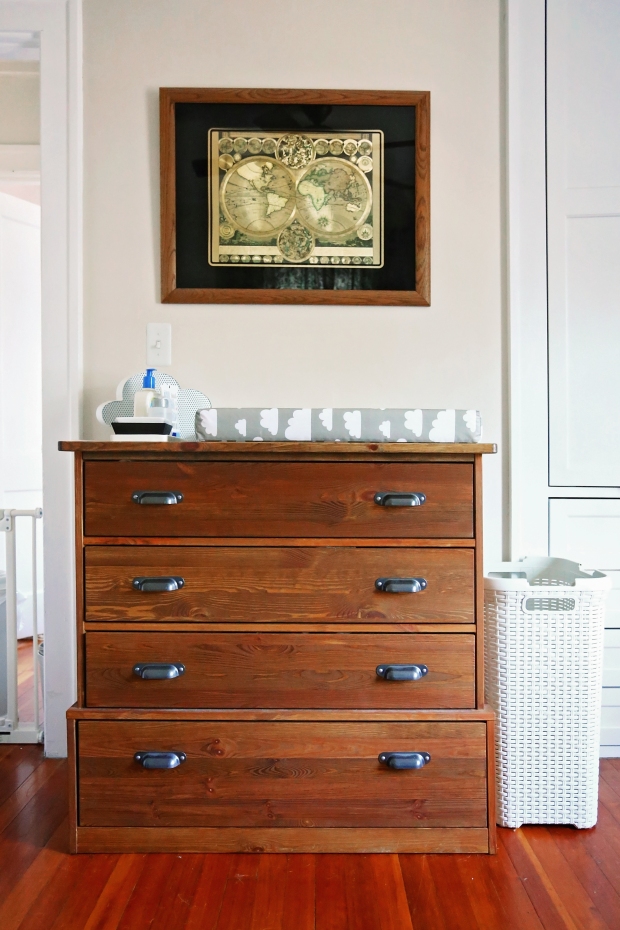
I never felt like I really had a complete “nursery” to post because we didn’t do the whole fancy-crib-with-floofy-bedding pinterest thing. The room was pretty much empty. We aren’t so much into that whole “baby” look and wanted something gender and age neutral that could grow with him and/or his future siblings. I assembled and stained an ikea dresser to use as a changing table and hung some curtains that I’d already bought but never got around to. The changing pad and rocking chair actually didn’t arrive until after he was born, so these were my “pre-baby” photos:

IMG_9461

image

For the next few months it became a space to fold clean laundry and, well, accumulate piles. It’s a small room and I tried to keep furnishings and clutter minimal for when he began toddling and needed a dog-free area, but in the meantime it was just a place to rock him to sleep and change his diaper.

IMG_4410

Oh yeah, diapers. We use cloth and I kept seeing people online ask for cute storage ideas. I tried to remind myself to take updated photos because I think this works really well for our small space.

IMG_4427

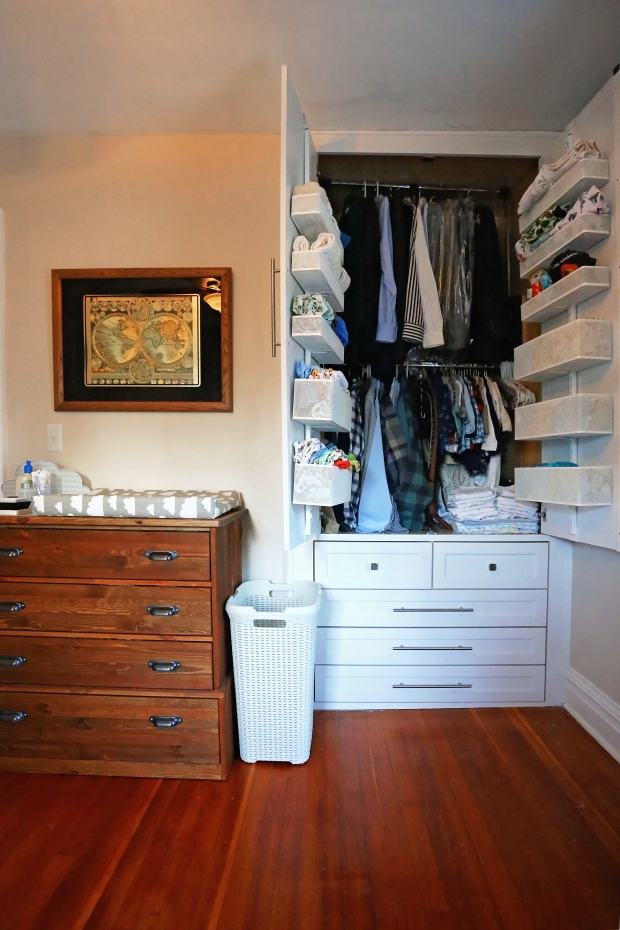
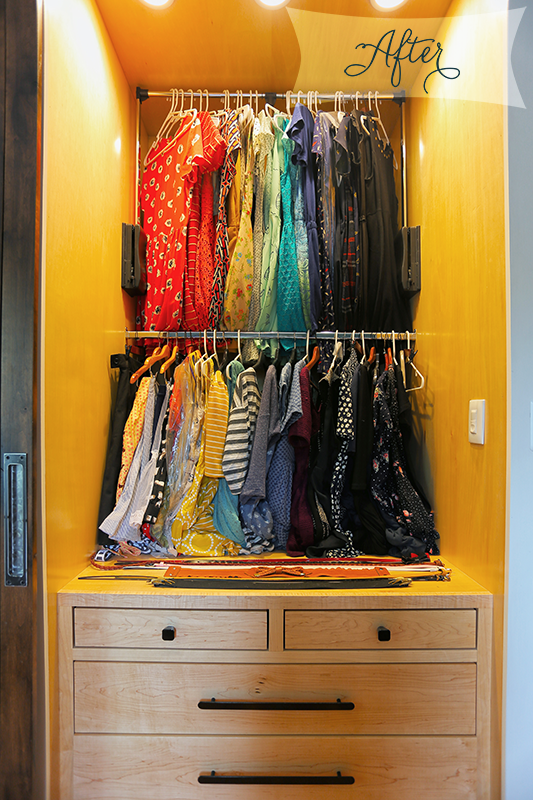
Being that our house is pretty small (~1300 sqft give or take) and closet space is at a premium, we decided to have M’s clothes live in the nursery closet. After all, how many hanging clothes does a baby have? We have these nifty built in closets which optimize space but really are best for grown up sized clothing. But inside the doors of the closet? That’s where the party is.

IMG_4418FullSizeRender-9.jpg

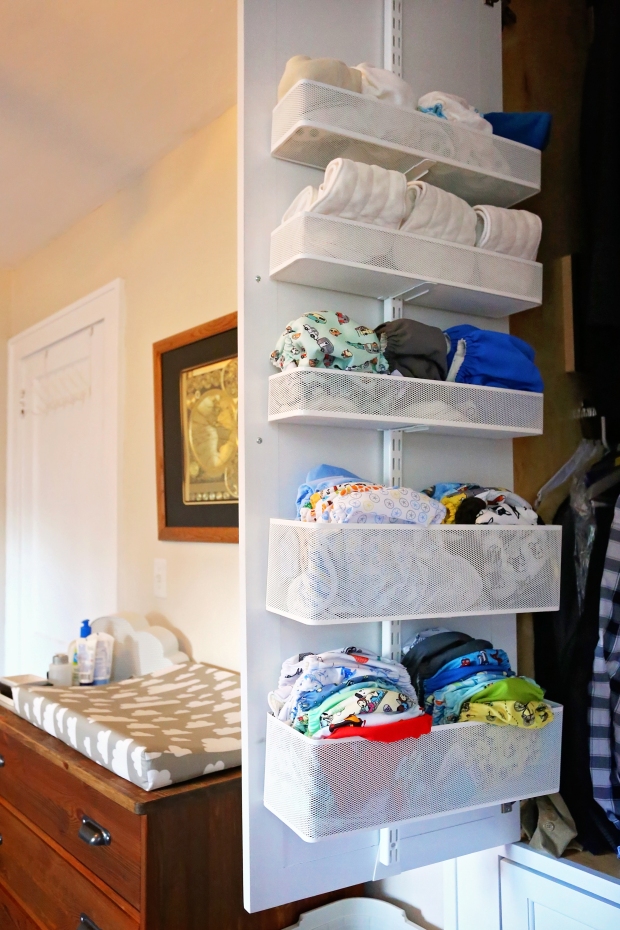
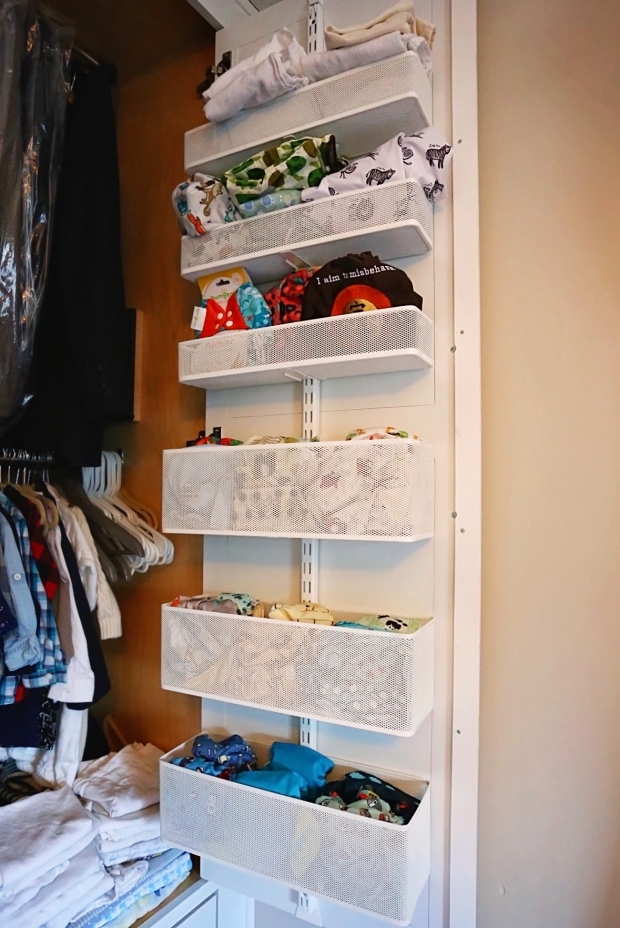
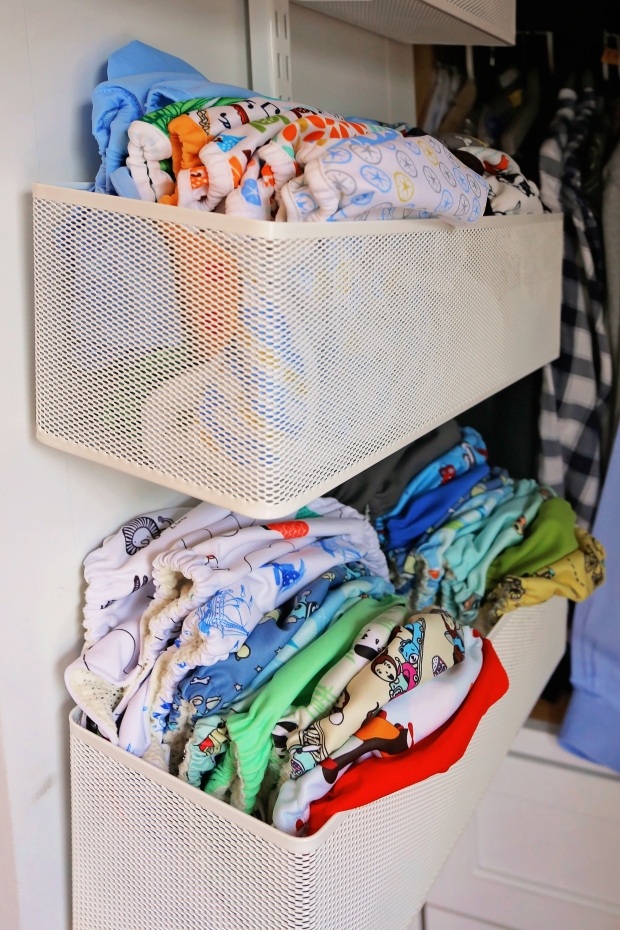
Seriously look how colorful and cheery they are! The side closest to the changing table has covers on bottom and nighttime diapers on top.

IMG_4485

The right side has all-in-ones as well as my custom serenity cover, a few I’m keeping NIP for now, and wetbags and flour sack towels on top. All the components are Elfa from the Container Store and hang on the door with a clip so there was no drilling required. they would work on any closet or entry door.

IMG_4504

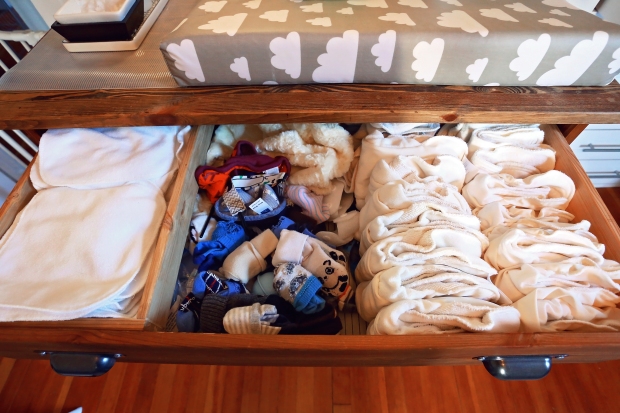
In the top dresser drawer are the wipes and inserts. Second drawer holds clothes (not pictured because it’s a mess).

IMG_4476

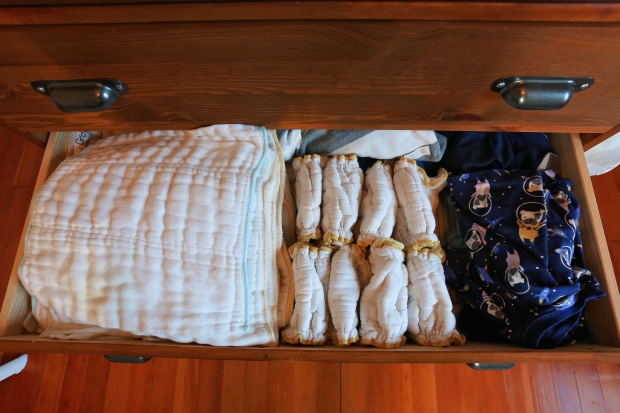
The third drawer has prefolds, fitteds, and pajamas.

IMG_4481

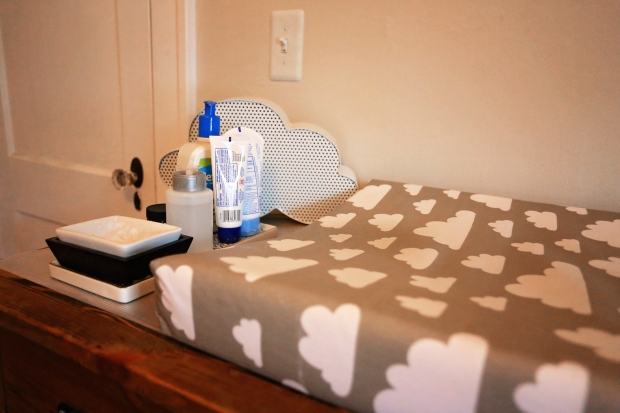
So yeah, I tried pretty much every kind of diaper just to see what would work best for us. The tray on the changing table has eczema cream, a pump bottle of water for the wipes, and coconut oil in a soap dish.

IMG_4412

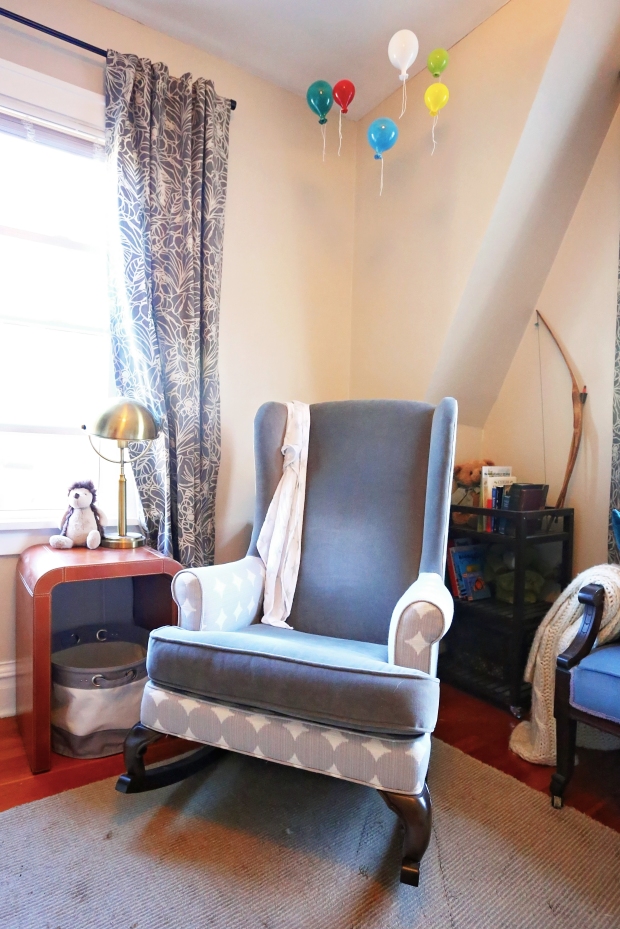
Oh, uh, and the rest of the room is super cool too. The chair is from Rocker Refined and was a very generous gift from M’s grandmother. The leather waterfall end tables were a local vintage find… I love how they’re relatively childproof but still look inviting and warm. The glass balloons on the ceiling were purchased in Venice on our babymoon and I thought added a nice “Up” touch to the subtle travel theme, as well as a pop of color to possibly the most monochromatic nursery ever.

IMG_4429.jpg

IMG_4502

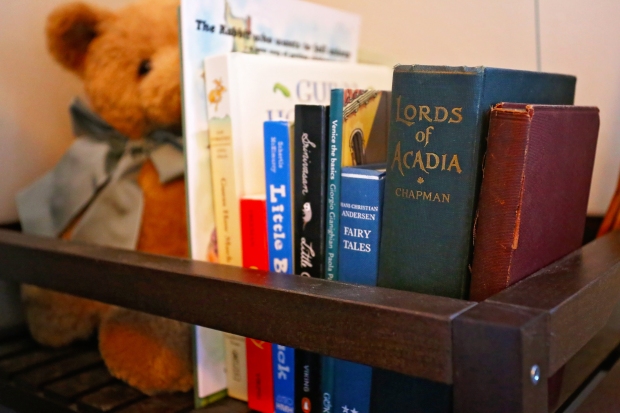
Behind the rocker is his little starter library which I’m sure will be expanding rapidly.

IMG_4440

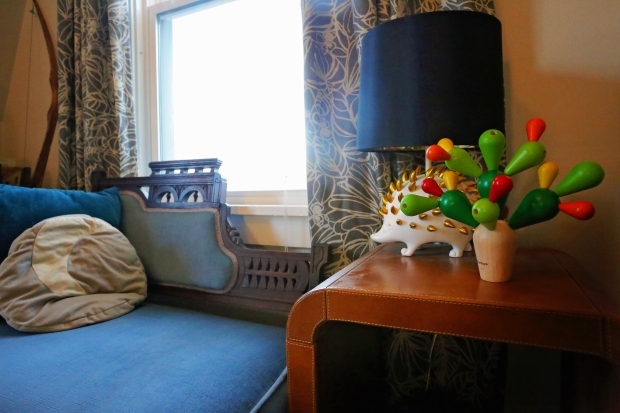
The blue settee and hedgehog lamp (both also visible in the pre-baby photos) aren’t quite kid-friendly but we don’t leave him in here alone so they haven’t been an issue yet.

IMG_4461

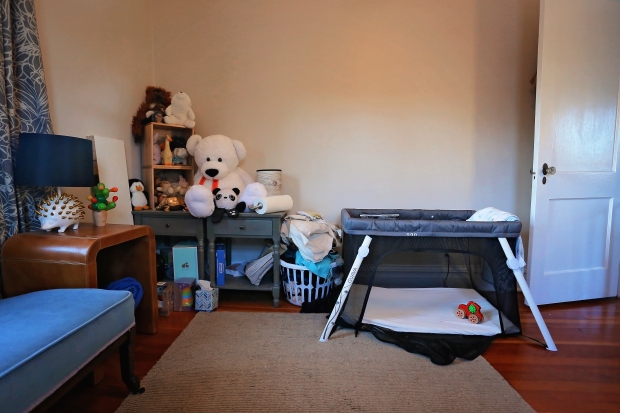
And just for the sake of blog transparency, this is the other side of the room. Sigh. I’m going to order some bookshelf-style shelving for those stuffed toys and get rid of the gray end tables. The lotus crib thing has never actually been slept in but maybe it will someday. A girl can hope, right?

IMG_4473

So there you have it. Still lots of progress to be made but we’re really enjoying it so far!

IMG_4470

Our home came in the mail! (Part II)

A long time ago, I posted Part I of this series, which chronicled the unusual history and charm of the Sears, Roebuck & Co. Kit Houses. In this post, I’ve compiled some photos from our house and from historical ads as a comparison. Sorry about the ridiculous delay. Life happened and I haven’t had the time to update here, but I still wanted to put the info out there in case it helped anyone.

Our house is a Sears Van Dorn, which was available only in the 1926, 1928, and 1933 catalog (and actually isn’t fully documented on the Sears Archives for some reason). It’s quite similar to the Van Jean and the Puritan— both Dutch Colonial Revival styles. Rosemary Thornton talks a bit about the Van Dorn here. And that’s pretty much all the info/original photos I’ve found. Anyone else out there living in a Van Dorn?

Here are some of the original features we’ve found in ours (as compared to the Arts & Crafts Society’s checklist):

IMG_9160-copy

Stamped lumber- this is basically the only definitive way to tell you have a Sears kit home. Technically some kit homes may not have stamped lumber, either because the buyer chose to locally source materials or because the materials and blueprints were purchased before they were all stamped. Some might have handwritten numbers and some might have nothing. But a huge majority of them do, so it’s a pretty quick and easy way to confirm a suspicion. Each original piece of lumber in the house should be stamped, but the easiest way to check is in the basement (assuming it’s still unfinished). Ours are along the center beam, not around the edges of the basement, so finding them was a little tricky (we also have blown-in insulation so I feared they had been covered up) but I found a note in The Houses that Sears Built that suggested they could face the center of the house instead of the outer walls, and Rosemary was correct!

IMG_9161-copy

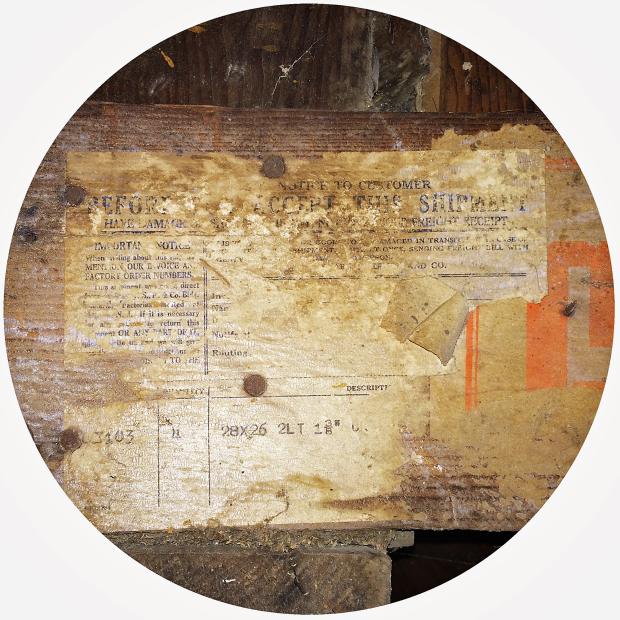
Shipping label– As I was searching our basement with a flashlight for the stamped lumber, I noticed something kind of strange. The back/underside of our basement stairs are held together by wood that is clearly different from the rest of the house. I always thought it was just scrap wood from some old crate, but as my flashlight passed, I noticed text on the wood. I had remembered seeing some of these shipping labels on various sites, and even though ours is too far gone to actually read most of the words, I can just barely make out “S. R. & Co” and some of the other text and stylistic features that are clearly the same as other examples.

Catalog number– As you can see above, the catalog number for the Van Dorn is C1234. I have a note that it’s written in grease pencil in the basement but can’t seem to find my photo of it. Will update if I do :/

IMG_7497-copy.png

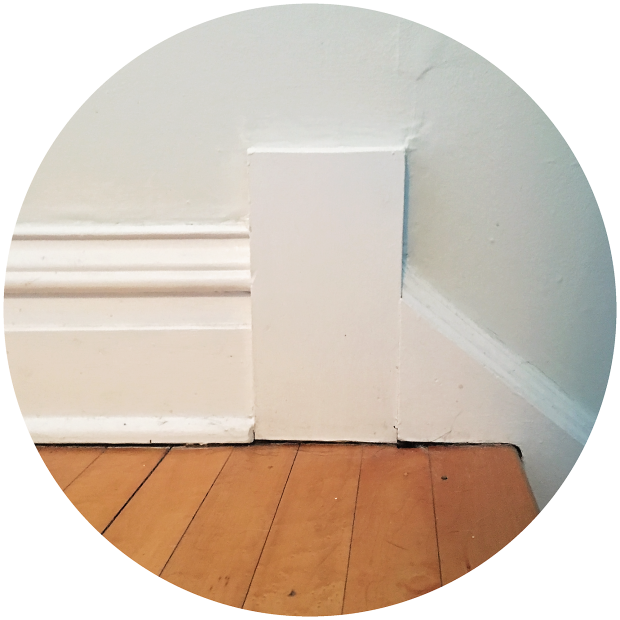
Blocks of shoe molding– these interesting transitions were designed for unskilled carpenters so that every awkward corner and joint wouldn’t have to be perfect. Instead of many angular cuts, irregular joins all have this detail, which is common throughout Sears homes. Our stairway between the first and second floors uses these blocks, but the basement stairs have a much simpler molding that wouldn’t have required as unusual cuts.

IMG_7500-copy.png

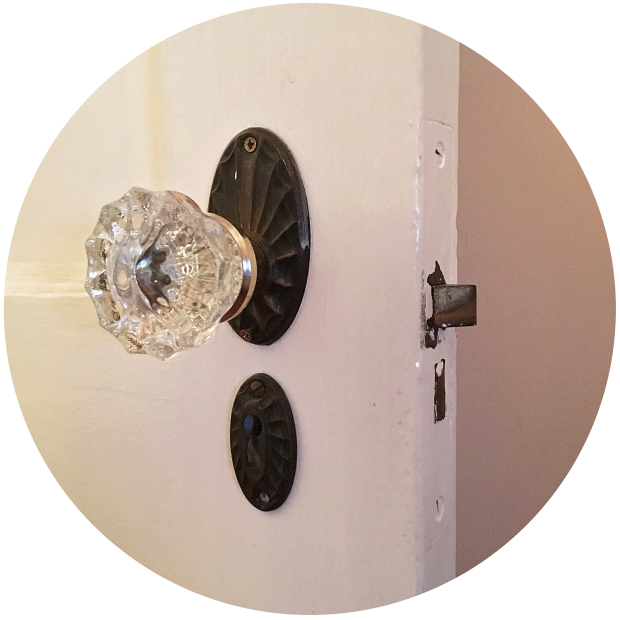
Doors and doorknobs– we have confirmed that one of the Sears hardware options for a house of this year (1928) would have been the Narcissus (below), which is consistent to both interior and exterior doors of the house. Our back patio doors are not original, so if I see another set of these at a salvage yard (fingers and toes crossed it will be a french door set!) I will swap them out and make them all match.

Some hinges and latches– I outlined in this post some of the trials of getting the original bathroom hardware back into shape (and here, some of the dining room). The notable thing about the bathroom fixtures was that, under all the paint and rust, the latches were nickel plated brass, which is noted on the original catalog page (above). We also have all the original ball tipped door hinges, although that isn’t really a defining characteristic of a Sears house– they were very common.

Attic windows– we actually haven’t been up here since we bought the house, but are planning on turning it into living space this spring/summer. One thing I did notice immediately was the original semi-circle mirrors on both sides, which is consistent with the original images in the catalog. We have one basement window and one stairway window that are original as well, but they are less distinctive. These windows don’t prove it is a Sears house, but comparing our house to the catalog sketch, they are a quick reference that helps us match it up.

We have a few other original touches, like the medicine cabinet, hardwood floors, and stairs, but they would be hard to identify vs. a non-kit home from the same era. An interesting note is that our floors do follow the same pattern as the catalog says they should– oak in the living and dining rooms and the entryway, maple in the kitchen and bathroom, and yellow pine everywhere else. When we first moved in I thought it was fascinating that every room, even the bathroom, had hardwoods– but they weren’t all the same. I assumed that they had been changed at some point in the home’s history. But looking back it seems that they are all totally original (except in our 1/2 bath downstairs which was made by combining a coat closet and space for an ice box in the kitchen– the floors in there are clearly different which makes sense since it was a combination of two different rooms)

Do you have a Sears house? Is anything fun still left in original condition? I’d love to see photos!

Cheers,

 v

As a disclaimer,  just because I truly care about the history of this house and want to see how it was originally built, in all its glory, does not make me a professional nor a preservationist. I want to maintain charm in my house but don’t necessarily feel like I need to stick 100% to period for things like furnishings and paint colors. This blog is primarily about our tales of renovating/decorating, and sometimes I don’t choose to go with what’s traditional. I will never take something original OUT of the house, but when it comes to bringing IN new things, sometimes I want to put my own stamp on it since, after all, it is my house. Just in case you stumbled here by Google search and are looking to see a full to-period restoration of a 1928 house, I’m sorry but I can’t promise that. I do mostly shop vintage but sometimes will choose a mid-century or victorian piece to mix in with the deco and dutch colonial stylings of the rest of the house.

Master Bedroom Revisited

It’s been a while since my last progress post… and I’m still working on compiling some info to write the second half of my last post about Sears kit homes. In the meantime, I think two rooms are pretty close to “done”… or at least Phase 1 is nearly complete. Since the last time I wrote about the master bedroom, I have basically completed the outline that I wrote in this initial post.

As a reminder, here’s where it stood at the last update:

giftable@home

We moved our furniture in and I painted the room a cool, oceany blue (Behr #HDC-AC-23 Provence Blue). I installed Ikea’s Ranarp sconces and hung Popchartlab’s “No Sleep Til Breuckelen” print.

giftable@home

I was still waiting for some nice curtains to go on sale and was hoping to DIY the closet drawer pulls to look a little more special without spending thousands replacing all of them (large pulls in three bedrooms would have cost about $5k… nope.)

giftable@home

Since then……

I got those West Elm curtains on sale and hung them on these nifty arrow-end curtain rods from Overstock. I might need to add some backing to keep extra light out, but for now they’re fine. I love the added pattern in this relatively neutral room. M thinks they’re too visually busy.

giftable@home > bedroom revisited

I also spray painted the existing pulls in the closet. It would cost a fortune to actually replace them, so even though the shape is still kind of meh to me, at least now they look enameled and a little more substantial and vintage than the original Ikea brushed stainless look.

giftable@home > bedroom revisited

I used a coat of black spray primer and 3ish coats of black glossy spray. I picked a heavy duty one so that I won’t have to worry about the finish rubbing off (I think it was this Rust-Oleum Professional High Performance Enamel Spray). I love the black-on-white look.

giftable@home > bedroom revisited

Inside the closet pulls are more of the same. I still hate the knobs so they’ll get replaced as soon as I find something I love. Otherwise, faux enameled black it is. The birch interior of the closet bugs me but not enough to break out the stain/paint. At least not right now.

giftable@home > bedroom revisited

I still really really want to add a white and black flokati rug but I can’t get myself to pay that kind of money. Especially in the summer. Especially with a puppy in the house. But one day… maybe. We also still need a full length mirror. Working on it…

giftable@home > bedroom revisited

And in case you’re wondering, M does actually own clothing. He just uses the closet in the guest bedroom.

That’s all for now! Some other progress and more history on Sears homes coming soon!

❤ v

Our home came in the mail! (Part I)

When I tell people that we live in a Sears kit home, I get mixed responses. About 75% of the time it’s a blank stare. A what? Another few will say they have heard of kit homes and know some basic info about them, but the real house geeks– the historians and preservationists and even a few contractors– are floored by this information. Once I mention it, a huge grin appears and they start rattling off facts about how these quality kit homes transformed the market, and what a joy it is to see or work on one in person. This brings a smile to my face as well… I could talk about the history of our house forever. But for the first two groups, here’s a 5 minute history lesson on Sears, Roebuck & Co kit houses.

The alternate purpose of this set of posts is for anyone searching for interior original features of kit homes. In my search, I’ve only been able to find three other houses of our model (the Van Dorn), and only two (kind of uninformative) interior photos. Many Sears homes have similar interior features, so maybe by adding ours to the directory I can help someone else who is hoping to restore theirs. I love seeing the interiors of other kit homes– how they’ve changed over the years and what has been kept original, so if you are in the same boat, I’d love to see your photos too!

Anyways, the history of Sears homes… as promised!

Between 1908 and 1940, Sears, Roebuck & Co. offered 447 (some say 370) different styles of mail order, pre-cut, build-it-yourself kit homes. They sent out regular catalogs and customers could arrange to have an entire house– everything from the plans and lumber to the paint and nails– delivered via rail to their town. Although detailed records were destroyed when the department finally closed, it’s estimated that about 75,000 “Modern Homes” were sold. They’re often compared to Ikea, in that they were to be assembled by the purchaser in small parts from a sheet of directions, but this comparison leaves out the ridiculously high-quality materials that were included with a Sears kit. For example, our 1928 Van Dorn still has the original floors, and not only do they still look brand new, but they actually look higher quality than the hardwood that is put in houses today. Rosemary Thornton explains in The Houses that Sears Built that the location of the company’s Illinois mill was well-positioned for top-of-the-line wood, and their choice to pre-cut allowed them to trim around imperfections and knots to get the most usable wood from each piece. A comparable hardwood floor today would be made from lower quality, newer growth trees. It’s pretty unbelievable for such a behemoth of a company to pay attention to the little details, but they did.

The idea behind the homes wasn’t to revolutionize the style of the quintessential American home. Most catalog styles were appropriate to period (the post-Victorian aesthetic was mainly simple bungalows and colonial revival) but tend to look very similar to architect-built houses, which makes actually identifying a kit house pretty difficult. The Arts & Crafts Society has a quick checklist to identifying Sears kit houses, in case you’re wondering if you’re in possession of one. One of the ideas behind the kit homes was just to sell simple blueprints for stylish homes that “a man of average abilities” could assemble in 90 days. This removed the need for pricey contractors, architects, or carpenters, and took the guesswork out of assembly, while guaranteeing a quality home. Perhaps even more valuable was the way that it enhanced the “American Dream”– not only could a new class of people own a home, but they could pour their own labor into it, making it truly one of a kind and special. Can you even imagine the modern-day liability of telling the “average” person he could build his own house? It definitely wasn’t the world we live in today.

The kind of surprising thing to keep in mind, in contrast to the idea that these were the Ikea of houses, they actually weren’t that inexpensive or basic. At the time, it was a small luxury (depending on the model) to have a house like this sent to you. Ornaments like moldings and millwork were standard in many plans and the materials were extremely high quality. The houses still saved customers many architect and skilled contractor fees, and helped lower income workers with easy payment plans (yes, Sears did pre-FHA private mortgages), allowing many people to buy houses that they wouldn’t been able to afford otherwise, but that didn’t make them slummy or cheap. I’ve traced back the origins of our house, and it was originally built by a large auto shop owner and commissioner of the nearby airport. Not a poor man, but not a millionaire either. Sears offered smaller, simpler cottages as well, but where they actually succeeded the most was bringing new, modern amenities to those outside of big cities. Around the turn of the century, that was water-tight roofs and solid (non-dirt) floors. Then, electricity and indoor plumbing (I love the ad below: Consider the advantages of plumbing in your home! Why, I don’t mind if I do). The Sears architects and designers would also alter any home at no charge, which allowed custom projects like additions, built-ins, and nicer finishes for wealthier clients. They also offered furnishing solutions from the Sears catalog (pretty genius marketing there, huh?)

Sears home parts were pre-cut near Chicago and shipped around the country via rail. So the most common places to find these homes are elsewhere in Illinois, around the midwest, or somewhere along a convenient rail line, usually in suburban or smaller urban neighborhoods that developed between the turn of the century and the 1930s (although many rail lines have been torn out since then, and some houses were shipped by other methods, so there are exceptions). Sometimes, in bustling company-driven towns, an employer would even buy dozens of kit homes and build an entire community for their workforce! I can’t say I’d mind that perk.

Sears homes could be outfitted with the newest technologies– indoor plumbing, central heat, and electricity. Of course, the earliest models weren’t, and later models could be ordered with or without (with a $23 outhouse being an optional add-on for rural customers). Luxury amenities like this were nice for homebuilders, but are just as nice now. Whereas a slightly older c.1900 Victorian would have been retrofitted with plumbing and electricity (and possibly done shoddily or resulting in a bizarre layout), the “Modern” kit homes still feel perfectly up-to-date with decent wiring and well-planned room flow. Our house still has the original 1928 wiring but we’ve been told by our inspector and a trusted electrician that it currently poses no danger and is still in good shape. [sidenote: a previous owner did update the main electrical box in the basement at some point, and some grounding wires have been put in, but the basic room-to-room wiring is original– cloth covered Greenfield, not knob-and-tube. But those details would depend on the era and who was building the house.] The houses were also built with a drywall product (Goodwall sheet plaster), which was easy to install and inexpensive. When we have contractors in our home, they try to convince me that the house was originally plaster and lathe, because of the age. The TV installer, in particular, assured me that he would need a complicated wiring and mounting rig for the wall-mount, and was shocked when he cut into 80 year old drywall. He tried to cover by claiming it must have been added on recently. Maybe I should send him a book 🙂

Houses ranged from ~$200-$8,000 and could even be customized or even totally reversed to suit the customer’s preference. So finding your house in an old catalog isn’t always as easy as finding the identical picture. Especially when 100 years of owners have put their own touches, extensions, renovations, and damages on top of it. In the next post I’ll talk about some of the original touches we’ve found helpful in identifying ours, but if you are looking for a more comprehensive guide, check out Houses By Mail.


I can get lost for hours looking at photos online. I can’t post them all here, but for your own searching pleasure, here are my favorite resources:

Daily Bungalow Flickr Page [most of the photos in this post came from here, but since Flickr is so bad about linking directly to an image, I had to grab them and upload them to my Pinterest]

SearsHomes.org 

Sears Archive

The Arts & Crafts Society

In the next post, I’ll compile and write about some photos of the original touches in our house. Do you have a Sears house? Is anything fun still left in original condition? I’d love to see photos!

Cheers,

❤ v

As a disclaimer,  just because I truly care about the history of this house and want to see how it was originally built, in all its glory, does not make me a professional nor a preservationist. I want to maintain charm in my house but don’t necessarily feel like I need to stick 100% to period for things like furnishings and paint colors. This blog is primarily about our tales of renovating/decorating, and sometimes I don’t choose to go with what’s traditional. I will never take something original OUT of the house, but when it comes to bringing IN new things, sometimes I want to put my own stamp on it since, after all, it is my house. Just in case you stumbled here by Google search and are looking to see a full to-period restoration of a 1928 house, I’m sorry but I can’t promise that. I do mostly shop vintage but sometimes will choose a mid-century piece to mix in with the deco and dutch colonial stylings of the rest of the house.

New Old Furniture

One of my initial conundrums was filling the awkward spot next to the bathtub with something other than an Expedit (photo of previous owner’s set-up)

IMG_8442

I briefly looked around at hook/shelf combinations but really thought we needed closed storage space for things like toilet paper and extra tissues, candles, shampoo, etc. But I didn’t want to spend much since the humidity in the bathroom is usually bad news for furniture. I couldn’t believe when I had the opportunity to walk through an old hotel that had closed and buy a few pieces at bargain-basement prices from the new owner. One piece was actually a TV stand, but it had the right dimensions and closed shelving, so I offered $30 and was accepted!

IMG_4062

One thing I didn’t check while measuring was the actual condition of the unit. The lighting was dark and I was rushing around from room to room. When I got it home, I left it in the garage for a few weeks before actually inspecting it.

IMG_5175

The condition was pretty appalling. Most of the other pieces from this trek are in wonderful condition considering their age and heavy use, but this one did not have that luck. Aside from being absolutely disgustingly filthy (below is the pile of paper towels used from just trying to clean it with oil soap), the large cabinet had been painted and other parts had been badly patched and stapled back together.

IMG_4884

IMG_5191

The large cabinet had also been (badly) painted kelly green at some point in the distant past.

IMG_5186

But it was still a solid wood piece of furniture, and still a good price. It just meant I had to paint it– something I kind of hate doing to (mostly) unpainted antiques, but there was no way to clean this up.

IMG_5193

I sanded it down, removed all the hardware, and spray primed (I covered the cute wooden wheels in painters tape for this step). I used the leftover navy paint from the dining room built-in project (Behr Nocturne Blue #HDC-CL-28)– it took three good coats to be totally solid. I also painted the insides of the drawers…. figured the only way to get it really truly clean was to coat it in paint after drenching it in soap (and then adding liners for good measure).

So much better already!

IMG_5229

For the pulls, I wanted to match the style of the furniture, and the bathroom, but also be a little bit playful. Since the piece is so dark, I opted for brass instead of oil rubbed bronze (or cut glass, which was another option and already exists in other parts of the house). I wanted it to be a little bit regency, a little bit MCM, and a little bit deco/colonial. The pulls are from Lee Valley and the knobs from Anthropologie. I love them both.

IMG_5496

If you’re wondering about the original hardware, it was 100% crap. Two of the pieces broke as I was (gently) removing them. They are like aluminum foil thickness and also not very nice looking. Out you go! (intact ones will get donated to the ReStore in case someone else needs a replacement or something). The brass hinges and door catch are original, though… just cleaned with some sandpaper and steel wool.

And just for fun, here’s the final cost breakdown:

Vintage TV stand: $30
Two drawer pulls (Leather Hardware from Lee Valley): $21
Three knobs (Streamline Knob from Anthro): $18
Paint (Behr #HDC-CL-28 leftover from the Dining Room): $0
Total: $69.00

So there you have it! I love it, do you?

Full-room photos coming soon.

❤ v

New House!

So, we FINALLY bought a house in New Hampshire!!! This has been in the works for more years than I care to admit. Mike first told me he wanted to move to NH in 2004. I laughed and told him he’d be moving there alone. In 2008, once he’d put a ring on it, we took our first trip and I fell in love. We were living in Toronto at the time, but ended up moving back to NYC that August, where we stayed until 2011. Most of that time I was getting email updates about houses, but by the time we could book a weekend up north, the house in question was already sold. We decided to rent short term places until we found “the house”, and ended up empty handed after almost two years (with a 6 month break for the road trip) of constantly hunting.

I had just given up and was preparing to stay in our rental apartment for the winter. I finally bought a couch and unpacked the paper-covered artwork that had been sitting in the corner for nearly a year. And, of course, it happened. I got an automated email, just like I did every morning… but this one looked like it checked all the boxes. We dropped by the open house the first day it was listed and walked through relatively quickly and quietly. As soon as we stepped outside, we both whispered “we’re buying this house, right??”

And so we did. We’ve been under contract on houses before that have fallen through, so we didn’t get our hopes up until everything was signed.*

*(That’s not true– I made a secret board on pinterest and had already picked out paint colors. But I pretended that I wouldn’t have been totally bummed if it had fallen through.)

Enough talking. You want to see pictures?? These are from our inspection, so it’s all the previous owner’s belongings.

IMG_8390

The living room is the first thing you see when  you walk in the house. It’s super sunny and a great size. A previous owner had opened up the wall between the living and dining rooms, so the first floor has a totally open floor plan which is great. The front entrance area doesn’t have a lot of storage space (the coat closet has been converted to a 1/2 bath), but there’s a side entrance that will be more of a “mudroom” with space for shoes and coats.

IMG_8411

Most of the house has the original 1928 floors, doors, and knobs. I’m hoping we can find a few more to match, just to bring it all back to the correct period.

IMG_8413

A real set of stairs!! Yay!! I don’t know exactly what we’ll do here but my first thoughts are maybe a photo wall and definitely painting the risers somehow. I also hate hate hate that white railing but M says I can’t demo it until we have a plan for a replacement. So that doesn’t really work considering my plan was to never replace it and just not have a railing. We’ll see.
IMG_8422

IMG_8425

The basement is enormous and is actually dry-ish (rare for NH) and tall enough for M to stand up (almost unheard of). We will probably section it off so I have a laundry area and M finally gets a music studio. Hope our neighbors don’t mind!

IMG_8444

There is only one full bathroom, but it’s huge. The space is not well-utilized so we will do a bit of a renovation in here and maybe move some stuff around. Eventually. For now, I need to get that terrible dark brown color off the walls and do some major sanding (it’s hard to tell just how bad the paint job is… yikes). I do love the original accents in here but don’t know how functional they are, so I’m having an internal struggle about what it will end up looking like.

IMG_8452

There are three bedrooms that are all relatively small, but they each have a new built-in closet and plenty of light. We’ll use this one as a guest room.

It’s an antique Sears kit house, and in mostly original condition (minus the kitchen and closets), so I’m feeling a bit limited about changing things. That just means I have to be more creative instead of tearing it down to the studs like we did in Sutton. Not like I would anyway– the house is gorgeous as it is. We weren’t even considering move-in-ready homes, so I’m kind of amazed to be saying all of this. But I’m super excited to see where this journey takes us!!

What do you think?

❤ v